Step by step tutorial to automate playstore app deployment using fastlane and google cloud
6 min read

Table of contents
Fastlane is a tool that gives you command line interface to your Google Playstore developer account. This means you can build, sign and upload your app bundle to playstore from command line. In this article we teach you to create your build pipeline to achieve this.
Pre-requisites
Have you app ready and published first
This tutorial assumes that you already have a working app and you have uploaded and published it in play store the first time including all the graphics and other metadata.
I recommend you do this first step manually always to get a better understanding of all the steps that are needed. Some of these steps are about data safety and other legal items.
Create a google cloud account
Go to cloud.google.com and create an account and create a project.
About Fastlane
Fastlane is a command line tool written in Ruby. It is meant to automate the entire deployment process of the app which includes screenshots, uploading APKs, signing code updating description, etc. It is the to-do tool today for all major companies to use.
If you want to install and run fastlane on your local computer then I recommend you try these steps.
Automating App upload
The way this workflow would work is
You as a developer write code and test it locally and deploy it to the Git repository.
Github hook will inform Google Cloud that a new commit has been made and Google will trigger a build process.
Google Cloud Build then decides to build your app from source and also invoke Fastlane command to upload it to Playstore.
This is a dumbed down and simplified version for individual developer.
In reality, a developer will checkin to a branch of release candidate which will create a real candidate APK which will be tested by either manual or automated QA and then branch will be merged with a production cut branch, which will then get built and uploaded to Playstore. But we hide that complexity here.
Creating a Dockerfile in you code repository
We create a Dockerfile in the code repository that describes the steps needed to build and upload the APK to playstore.
FROM mingc/android-build-box AS build
WORKDIR /home/gradle/src
RUN apt-get update
RUN apt-get install -y openssl
RUN apt-get install ruby
RUN gem install bundler
RUN gem install fastlane
COPY ../. /home/gradle/src
WORKDIR /home/gradle/src
RUN ./gradlew clean
RUN ./gradlew bundleKadambariRelease
RUN gem install bundler
RUN gem install fastlane
RUN gem environment
RUN gem which bundler
RUN PATH="$(ruby -e 'print Gem.default_dir')/bin:$PATH"
RUN fastlane supply --aab app/build/outputs/bundle/<MyAppName>Release/app-<my-app-name>-release.aab
Note that this Dockerfile is pretty large. It is possible to split it into smaller with a base image that has Android and Fastlane installed and second one which just builds the code. But I leave that upto you.
Add Fastlane files to your code repository
Fastlane requires you to create what is called a "Fastfile" and "Appfile" in your code repository. These files have most of the information Fastlane needs to upload it to your playstore account.
I recommend you install Fastlane on your local machine and run the following command to generate those files
fastlane init
It will ask you series of questions to set everything up.
Setting up your google credentials
Open the Google Play Console
- Click Account Details, and note the Developer Account ID listed there
Enable the Google Play Developer API by selecting an existing Google Cloud Project that fits your needs and pushing ENABLE
- If you don't have an existing project or prefer to have a dedicated one for fastlane, create a new one here and follow the instructions
Open Service Accounts on Google Cloud and select the project you'd like to use
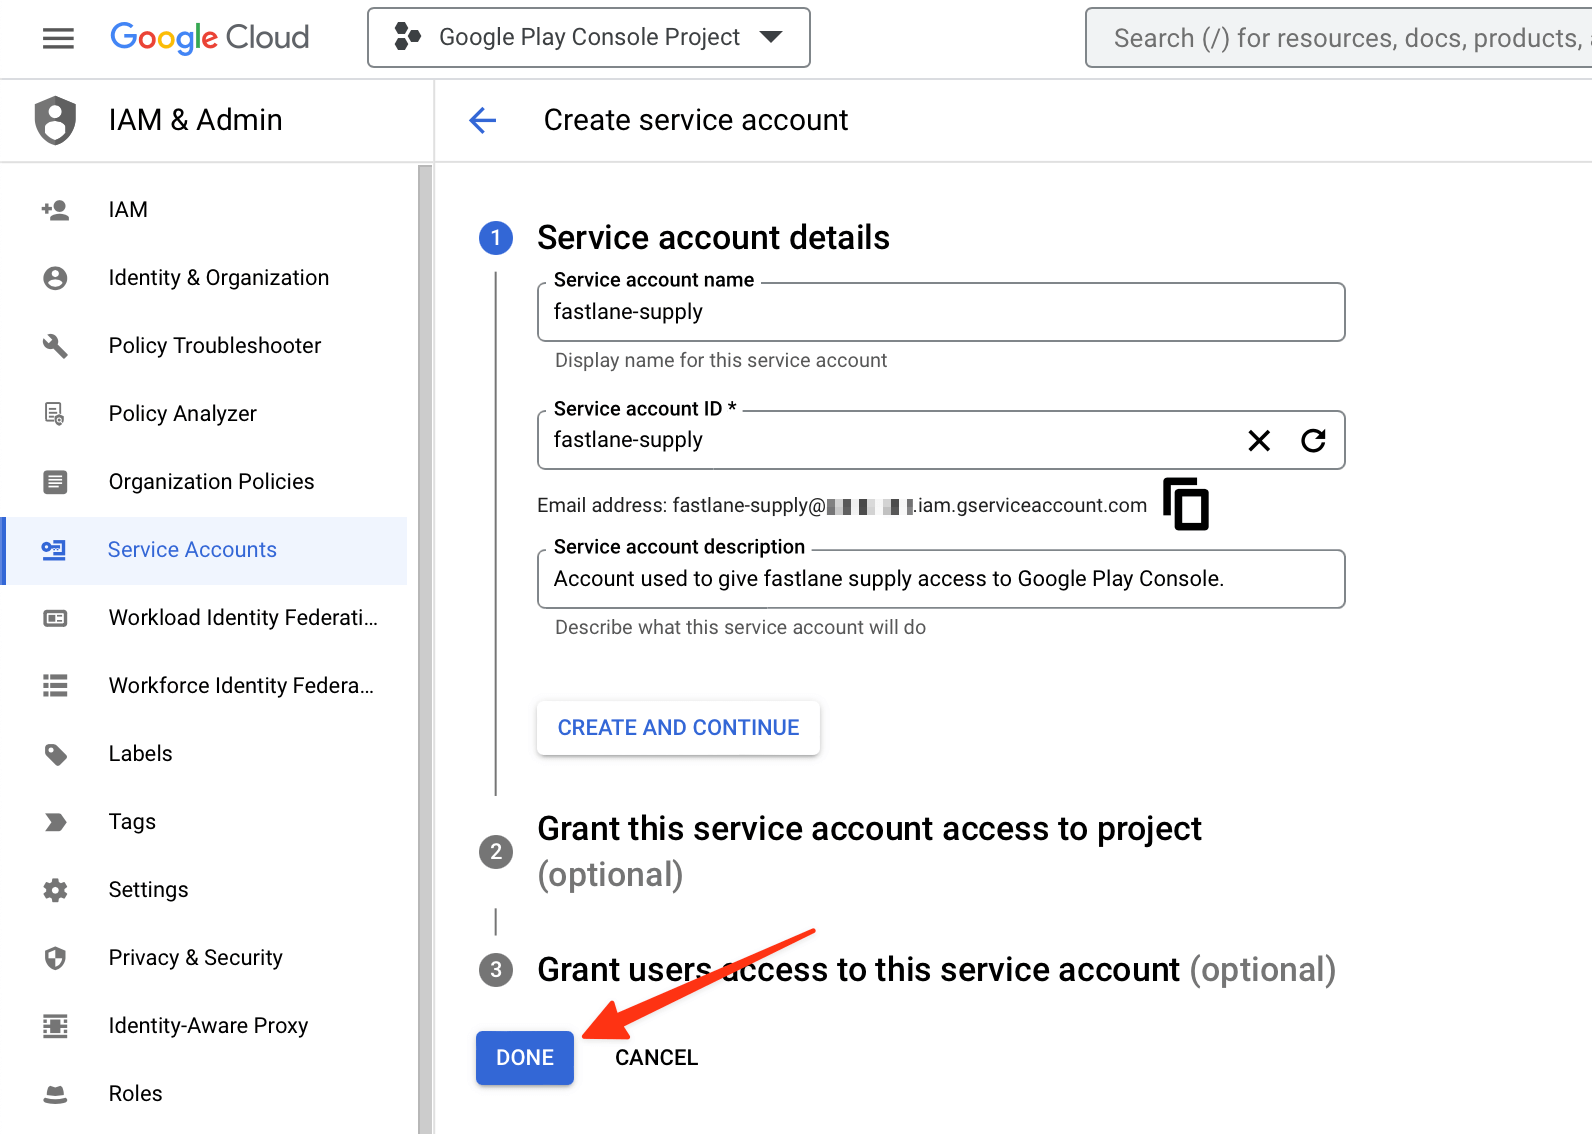
Click the CREATE SERVICE ACCOUNT button at the top of the Google Cloud Platform Console page
Verify that you are on the correct Google Cloud Platform Project by looking for the Developer Account ID from earlier within the light gray text in the second input, preceding
.iam.gserviceaccount.com, or by checking the project name in the navigaton bar. If not, open the picker in the top navigation bar, and find the right one.Provide a
Service account name(e.g. fastlane-supply)Copy the generated email address that is noted below the
Service account-IDfield for later useClick DONE (don't click CREATE AND CONTINUE as the optional steps such as granting access are not needed):

Click on the Actions vertical three-dot icon of the service account you just created
Select Manage keys on the menu
Click ADD KEY → Create New Key
Make sure JSON is selected as the
Key type, and click CREATESave the file on your computer when prompted and remember where it was saved at
Open the Google Play Console and select Users and Permissions
Click Invite new users
Paste the email address you saved for later use into the email address field
Click on Account Permissions
Choose the permissions you'd like this account to have. We recommend Admin (all permissions), but you may want to manually select all checkboxes and leave out some of the Releases permissions such as Release to production, exclude devices, and use Play App Signing
Click on Invite User
You can use fastlane run validate_play_store_json_key json_key:/path/to/your/downloaded/file.json to test the connection to Google Play Store with the downloaded private key. Once that works, add the path to the JSON file to your Appfile:
json_key_file("path/to/your/play-store-credentials.json")
package_name("my.package.name")
The path is relative to where you normally run fastlane.
Configure supply
Edit your fastlane/Appfile and change the json_key_file line to have the path to your credentials file:
json_key_file "/path/to/your/downloaded/key.json"
Fetch your app metadata
If your app has been created on the Google Play developer console, you're ready to start using supply to manage it! Run:
fastlane supply init
and all of your current Google Play store metadata will be downloaded to fastlane/metadata/android.
Setting up Google Cloud Build Trigger
Now that you have both Dockerfile and Fastlane's Fastfile and Appfile setup, it is time to setup Google Cloud Build Trigger.
A detailed and up to date tutorial is available here.
All you have to do is click on "New Trigger" connect your Github Repository to Google Cloud and then select Dockerfile as the build input. Then you are in business.
Is it all work
As soon as you make a Git commit and push it, the Google Trigger will do rest of the job. Initially you might see failures and that is fine. You can update your Dockerfile based on the logs provided by Google Cloud build.
